Building materials
In general
Here we present the various materials that can be used to build an oven. The proposed values are being used under normal circumstances. They won’t be correct in every case. During cold weather you have to take different proportions into account; the mortar proportions depend on the strength of the pressure of the brick, etc.
Also not every material can be used everywhere. In coastal areas, the mortar has to be resistant to salt deposits from the sea. So always check which materials are commonly used in your environment to know which ones are suitable.
Concrete
Substructure
For the substructure you can make concrete of these proportions:
- 1 unit of Portland cement
- 3 units of dry Rhine sand
- 4 units of gravel
- Add water till you get a thick mass
Concrete slab
Both oven floor and oven vault used to be supported on oak beams ( 15 x 12 cm) or on the stone vault of the oven cellar.
Nowadays to prevent the support structure from collapsing, a concrete slab is applied for support. You can create your own concrete slab by using the concrete floor elements (approximately 30 or 60 cm wide) on which you place a concrete pressure layer of approximately 3 cm.
To create the concrete slab and the pressure layer, you make concrete with following proportions:
- 1 unit of Portland cement
- 2 units of dry Rhine sand
- 3 units of gravel
- Add water until you get a thick mass. You can make your own concrete, but you can also buy it off the shelf in bags of 25 and 40 kilos. Then you only have to add water and mix it well.
Wall anchors
Because of the weight of the oven floor and the oven vault, the walls surrounding the vault and to a lesser extent that one of the substructure are supported mainly horizontally. There are forces directed slantwise outwards (arch action), that are usually restrained by iron wall anchors. The bolters are then visible from the outside. The spring is right above the supporting layer of wood, stone or concrete.
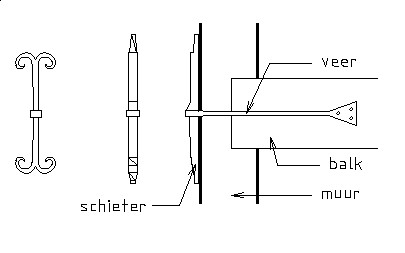


Drawing by Gerrit Van den dries
Shuttering planks
If the soil is not solid enough, for instance with sand, in order to pour the foundation you will have to provide a formwork wherein concrete cement can be poured. You can choose to leave it as it is or remove it, the shuttering planks are preferably smooth on the concrete side to facilitate the removal. Use for this a waterproof plate with smooth sides (for example concrete plex) or planed wood planks (approximately 2,5-3 cm thick) to which you apply paraffin wax; there are also special removal products on the market that you can apply to the wood.
Bricks
For the substructure of the oven of the bakehouse, you can use any type of brick (full brick - perforated brick - hollow brick). Depending on the appearance you can choose for smooth new stones or recycled hand-moulded bricks that have a more rural appearance.
Fire bricks
You can't just use any kind of brick for the oven floor, the oven vault and neither for the chimney. You should use full bricks that are fireproof and ( for the oven part) have enough mass to store heat.
Fireproof
The bricks have to be made out of fireproof material that is resistant to temperatures of approximately 500°C, and can sustain temperature changes: during stoking, the temperature rises up to 350-400°C, the baking temperature is approximately 190-210°C after which the vault cools down to approximately outside temperature. The full brick made out of clay and baked at 900-1100°C can easily sustain temperatures till 500°C. You can also use fireproof rocks (resistant to 1260-1430°C) but that isn’t necessary.
Storing sufficient heat
You have to have a heavy mass because the oven floor and oven vault need to stock sufficient heat during stoking. You also need to sufficiently insulate (the heat conduction has to be put as low as possible) to limit heat loss.
The brick (made of clay) has to be compact and heavy, and also baked nice and even. The stone sounds clear because of this.
Many (recent) bricks, used as façade, contain toxic mineral traces of metallic salts and are not suited for building an oven floor or oven vault.
Most recycled hand-moulded bricks are suitable if they are baked at a high enough temperature: You can also use it for the rest of the construction. Make sure that you pick the best stones, and without soot, when building the oven floor and oven vault.
Tips
- Preferably, you should use rough stones , especially in the case of newly made bricks, to improve the adhesion with the mortar. It is for that matter that the materials need to be clean and clear of dust.
- Some examples of bricks that are commonly used to build the oven section, are: full hand-moulded bricks (stone from Kempen, stone from Boom, klamp stone) chamotte bricks, burgundy bricks etc.;
- For the chimney you should rather use smooth, but porous stones to absorb the water vapours of combustion gases;
- The oven floor also has to be resistant to regular friction of the oven-rake, peel, baking moulds, etc. Besides from bricks you can also use abrasion resistant and smooth fireproof tiles. Go for large (approximately 20 cm by 20 cm), preferably thick (traditionally approximately 5-10 cm) tiles as smooth as possible to prevent too much loss of heat. To reach this level of thickness you can also place two thin floors on top of each other.
Sand
Insulating bottom layer out of sand
Underneath the supposed oven layer there is a layer of sand on which the supposed floor is put and a layer of loam to reduce heat loss. The sand layer consists of Rhine sand or sandy clay and can be mixed with 1/2 unit of Portland cement on 5 unities of sand. This can also be called thin screed. You cannot apply the sand layer directly on the bottom layer if it consists of wooden beams. That’s why we first apply a loam layer (approximately 5-7 cm) mixed with lime and straw. Some oven builders apply an insulating layer out of brick or out of a concrete slab based on vermiculite. The layer is in any case 8 to 10 centimetres thick.
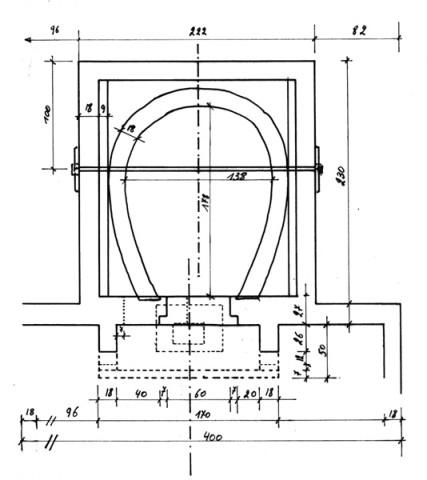
Support centring
The support centring serves as the foundation for building the oven vault. It is usually sculpted out of moist coarse sand ( granular size approximately 0,7-4 mm).
Some builders use wooden molds ( chipboard -plywood) to give the right shape to the masonry. Afterwards you can burn up the wooden construction , or if it consists of smaller parts, you could remove them via the oven mouth.
Bastard mortar
To build the substructure and the bakehouse, you need to make a bastard mortar from binding agents like cement and lime ( not to be confused with plaster), and impovering agents like sand and water.
When making mortar during Summer time, you stick to the following proportions:
- 1 unit of Portland cement
- 1 unit of slaked lime ( hydrated lime or calcium hydroxide are other denominations for slaked lime.)
- 6 units of Rhine sand
- Add water till you get a thick mass
During Winter time you should use the following proportions:
- 1 unit of Portland cement
- 0,5 unit of slaked lime
- 4,5 units of Rhine sand
- Add water till you get a thick mass
You can prepare your own mortar, but you can also buy readymade mortar of the dry variety in bags of 40 kilos for example. Then you only have to add water and mix it well.
The prepared mortar has to be processed in 2 hours. If the exterior temperature is higher than 20 degrees, then the processing time is reduced to 1 hour. So do not prepare too much mortar in one time. Also never prepare mortar after that is starting to become solid.
Loam mortar - lime mortar - fire resistant mortar
For the oven floor, the vault and the chimney you need a mortar that is resistant to high temperatures.
Oven builders used to use a loam mortar for the vault. It consisted of:
- loam soil poor in humus ( with a maximum of 15-20% clay)
- sand
- water
You can check the proportions of clay in the soil by conducting a sedimentation test. Clayey loam soil (more than 30% of clay) is difficult to process and shrinks too much during drying and therefore the joints of the vault can probably burst when stoking for the first time. Then you have to decrease it with the following proportions:
- 2 units of loam
- 3 units of Rhine sand
- You can use slaked lime to make the mortar more elastic.
- Add water till you get a thick mass
You can check the shrinking size, that can only contain 6% as a maximum, and the cohesion with the following test.
The ideal loam mortar depends on 3 factors: the amount of clay present, the shrinkage and the cohesion. Avoid pebbles in the mortar at all times, because those can come with thick mortar joints that can obstruct the smooth processing.
During the Workshop build your own oven, the loam mortar is prepared with following proportions:
- 3 units of loam mixture
- 1 unit of chaffed lime
- water
The loam mixture is a bought mixture (brand name: Claytec) of
- 1 unit of loam
- 2 units of sand
- chopped straw 10 millimeters
You can prepare the loam mortar in big quantities. When sealing the mortar hermetically, it can be used on the next day. Place a plastic foil on top of it and push the air out from underneath the foil.
Other oven builders use a lime mortar for constructing the vault with the following measurements:
- 2 units of sandy clay
- 1 unit of Rhine sand
- 1 unit of chaffed lime
- add water until you get an elastic mass
Make sure that the mortar is elastic enough to intercept the expansion and shrinking of the vault. Decrease the mortar with sand if it is “too fat” (too rich in lime), to prevent bursts during the drying process. Avoid mortar made of hydraulic lime that can burst open through heat.
Nowadays you can choose for a readymade fireproof mortar resistant to temperatures of 500 degrees.
You can prepare loam- and lime mortar already 1 to 2 weeks in advance. Fire resistant mortar, based on calcium aluminate cement, has to be processed before it begins to turn hard.
In order to build the chimney, aside from fire resistant mortar you can also use a cement mortar with following proportions:
- 1 unit of Portland cement
- 1,5 units of hydraulic lime
- 7 units of Rhine sand
- add water until you get a thick mass
Insulating loam layer - sand layer
A loam layer of approximately 10-15 centimetres is applied to the vault as coating.
This layer is prepared with the following proportions.
- 3 units of loam
- 1/2 unit of slaked lime
- 1 unit of Rhine sand
- 1 unit of chopped straw from 4 to 6 centimetres in length.
- Add water until you get a thick mass
Sometimes people used to add horse urine, namely 1/20 of the used measuring unit. If you are using a bucket of 10 litres, then you add one litre of horse urine to the mixture of 3 buckets of loam, 1/2 bucket of chaffed lime, 1 bucket of Rhine sand and 2 buckets of chopped straw.
Also here the ideal recipe doesn't exist. If the loam starts to burst during drying, then add more straw or make it thinner by adding sand.
Some oven builders avoid having sand in their cement because it only adds up weight. The ratio of straw is then way higher:
- approximately 60 kilos of loam (moist)
- approximately 12,5 kilos of slaked lime
- approximately 4,5 kilos of chopped straw
- approximately 30 litres of water
One oven builder insulates the vault with half of a bat that is plastered afterwards with lime mortar to which chopped straw was added. You can add coloured cement to this until you get the desired loam colour.
Other oven builders fill up the space around the vault with sand. Here you have to build small walls around the vault up to the roof. The thickness of the sand is approximately 40 cm, measured on top of the vault. You can apply an insulation layer of stone wool (for example Rockwoll) of 10 cm thick without vapor barrier to the vault. Stone wool (not to be confused with glass wool) is resistant up to 1200°.
To reduce the weight you can mix the sand with grains of expanded clay aggregate ( for example Argex) or ground pozzolan (light and fire resistant). The filling occurs afterwards with a layer of expanded clay aggregate alternating with a layer of dry sand to fill up the gaps.
Carpentry
For measuring out the construction site, the formwork, the masonry of the walls and roof construction, you need beams, chevrons, and battens.
To measure out the place of construction and the positions of the mortar profiles you need:
- pickets of approximately 50 cm
- boards with one straight planed side of approximately 200 cm long and approximately 10 cm by 2-2,5 cm
- nails ( 5 to 6,5 cm)
- masonry profiles with one right planed side of approximately 200 cm long and approximately 7-10 by 6-10 cm
- crossbeams for bottom side profile of approximately 50-60 cm long
- gauge rods and story rods to place the mortar profile perpendicularly of approximately 250 cm and approximately 7,5 cm by 2,5 cm
- timber battens of approximately 100 cm long and approximately 4 cm by 3 cm for measuring brick layers and headers
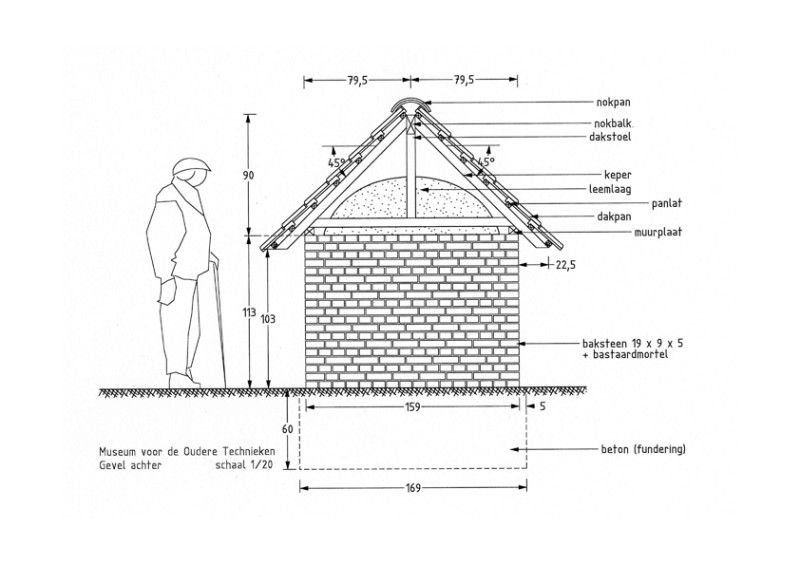
For the roof construction you need:
- ridge board of approximately 7 cm wide and approximately 14 cm thick
- wall plates of approximately 7 cm wide and approximately 6 cm thick
- joists of approximately 6 cm wide and approximately 7 cm thick
- tile laths of approximately 4 cm wide and approximately 3 cm thick
- timber roof truss that consists of beams of approximately 6,5 cm wide and approximately 7 cm thick
Roof tiles
As roof cover you can choose whatever kind of material that is suitable for this. This will also determine the appearance of your bread oven.