Boring the trunk
The crucial skill of the pumpmaker is, of course, the piercing of the pump body lenghtwise. The bore is done in a drilling installation in several stages each using different sets of pump drill bits. Smooth and accurate drilling depends on many factors such as professional knowledge, experience and good equipment. Wood knots crossing the centerline of the trunk can make drilling difficult. In total, it quickly takes up to eight hours of drilling for a trunk of four to five meters long, a very strenuous activity for two to three people. In this experiment, without any previous experience, we needed an alternating team of three to four people to be able to keep up with the hard work.
Boring installation
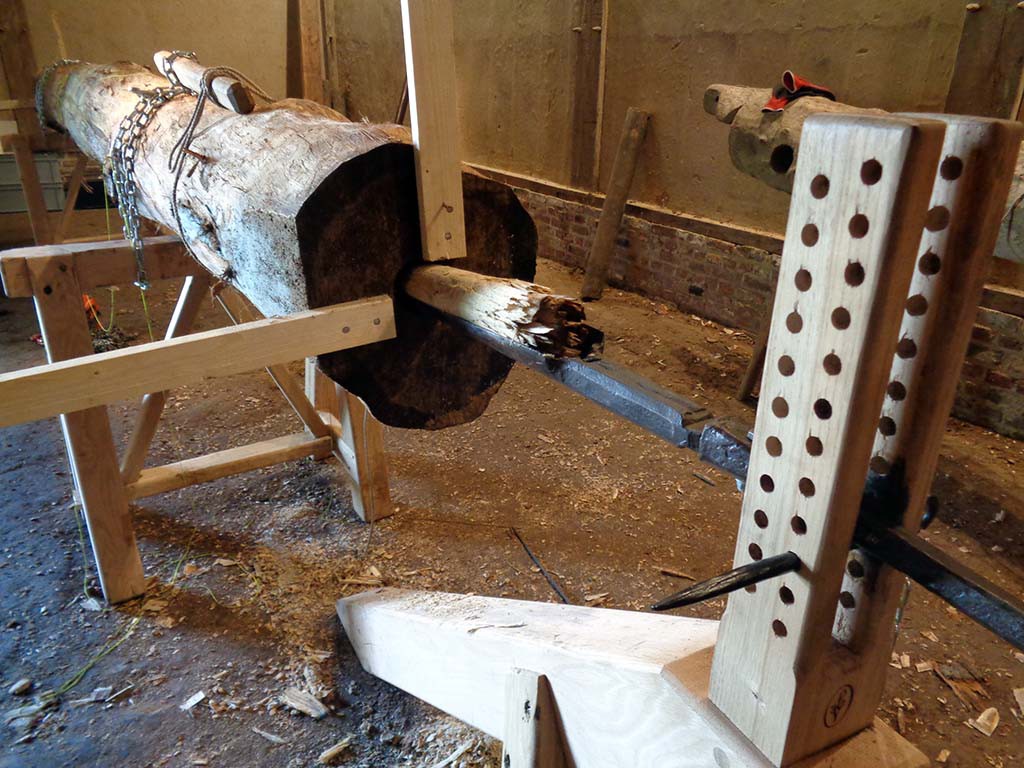
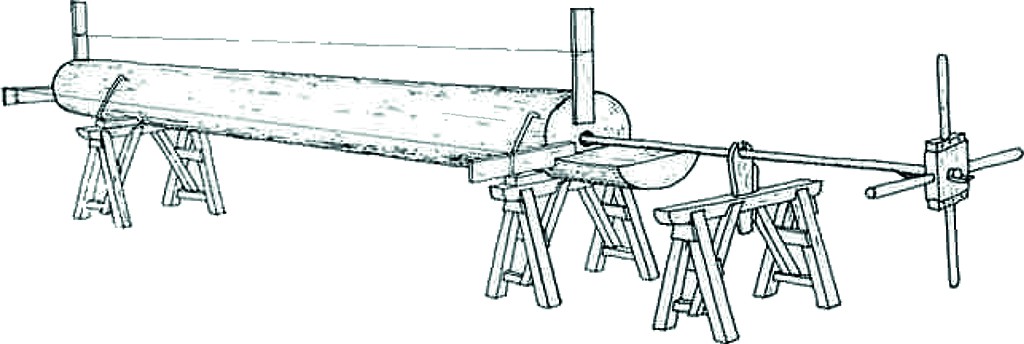
The tree trunk is fixed on two trestles at a comfortable working height of about 80-100 cm by means of chains and brackets. The trestles and trunk are placed as horizontally as possible. In reality pumpmakers often worked on uneven ground, which in itself is not an obstacle to maintain a straight borehole through the center.
The long wrought iron shaft of the pump auger rests on an adjustable wooden horse, which is moved regularly folowing the progress of the drill. We opted for a three-legged model, because it is more stable. Four-legged horses tend to bend with the heavy rotating and retracting the bur. Old drawings show many variations of this arrangement, such as a third trestle or other self-made constructions on which the pump auger shaft rests. What is essential is that the horse is provided with a device to adjust the drill bit to the correct height, in this case a series of holes at various heights into which an iron pin is inserted, on which the auger rests.
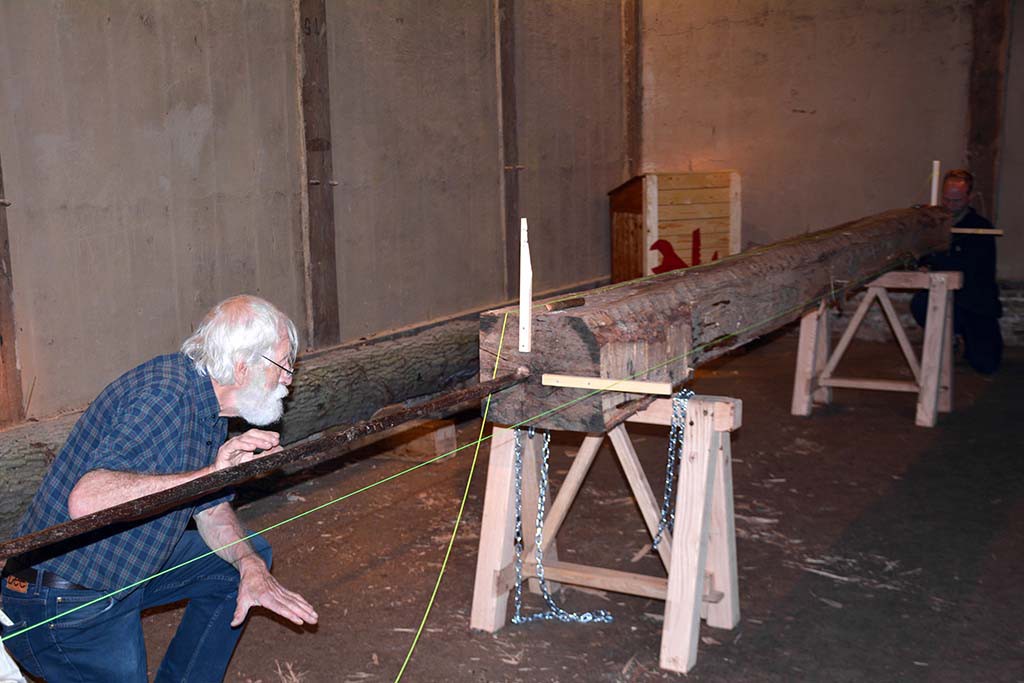
Before aligning the borehole with cords or lines, the center point is first determined at both ends of the trunk with a plumb bob and square. From this point two wooden gauges are fitted on each side both horizontally and vertically. In between two mason's lines are stretched, parallel to the centerline of the trunk, so that the central position of the pump auger can be visually checked in order to drill in a clean, straight line through the trunk. We found out that these lines must be checked very regularly, given the enormous forces exerted on the trunk. Sometimes a chalk line is used to mark the centrings with soot, charcoal or pigment.
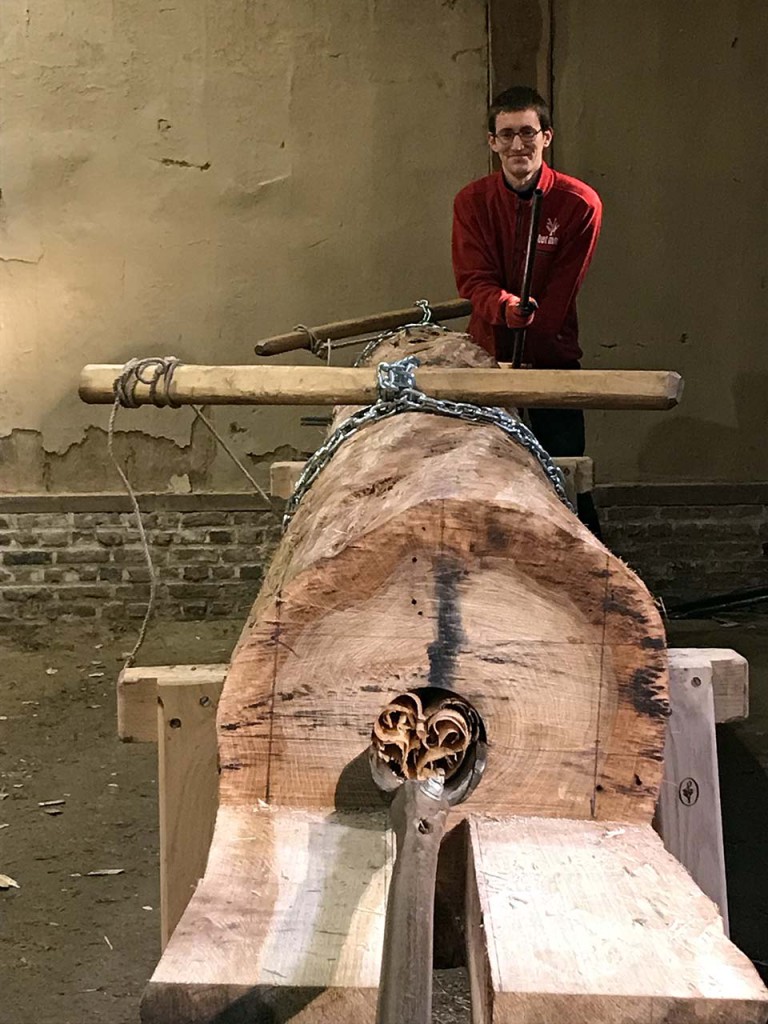
The shaft of the pump auger is attached to a wooden crank with a wedge. There are examples of two-armed and four-armed cranks. Luc Verachtert made sturdy replicas of each model with metal fittings. The length of the crank arms is crucial. We experienced that they should have been ten centimeters longer to make optimal use of the leverage function.
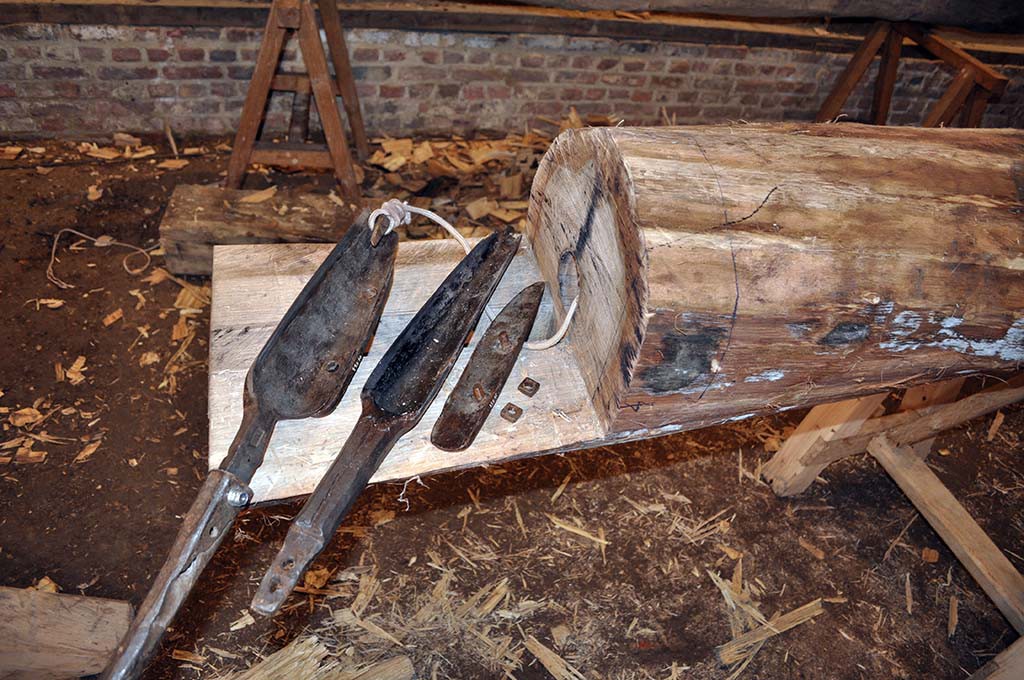
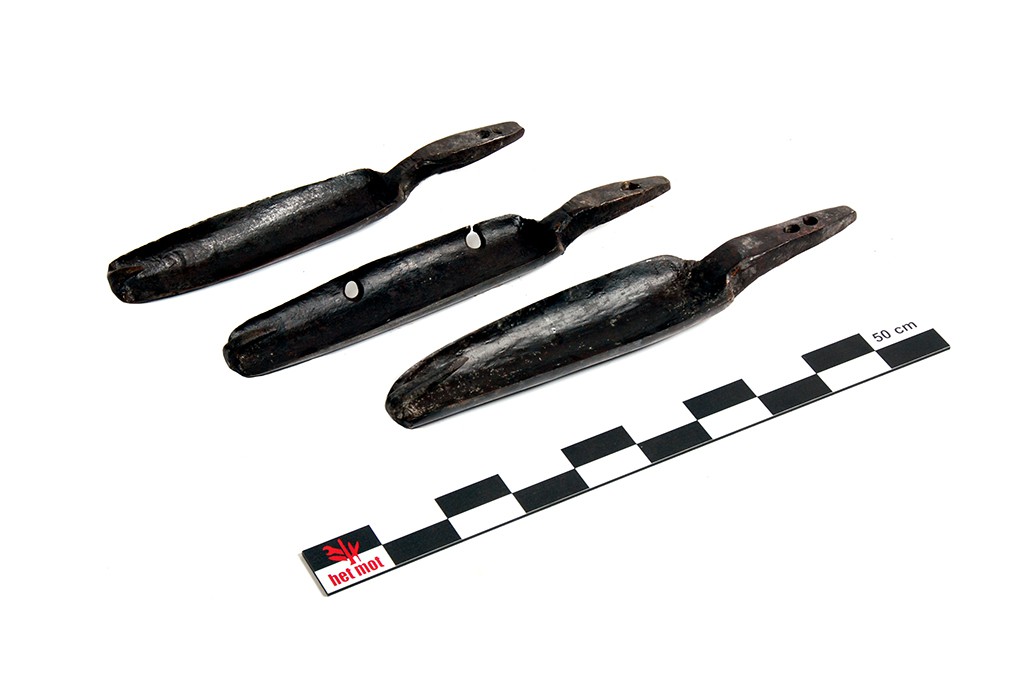
The cutting part of the pump rip bit only needs little work to stay sharp. Their efficiency is mainly due to their shape, which is worth further investigation. On the inside, the cutting part is lightly sharpened with a file. Pumpmaker Oscar De Wagter explained during his visit that only the inside cutting edge was filed. By lightly filing or making a mark with a marker, you can check where the rip bit cuts into the trunk.
First step: drilling the pilot hole
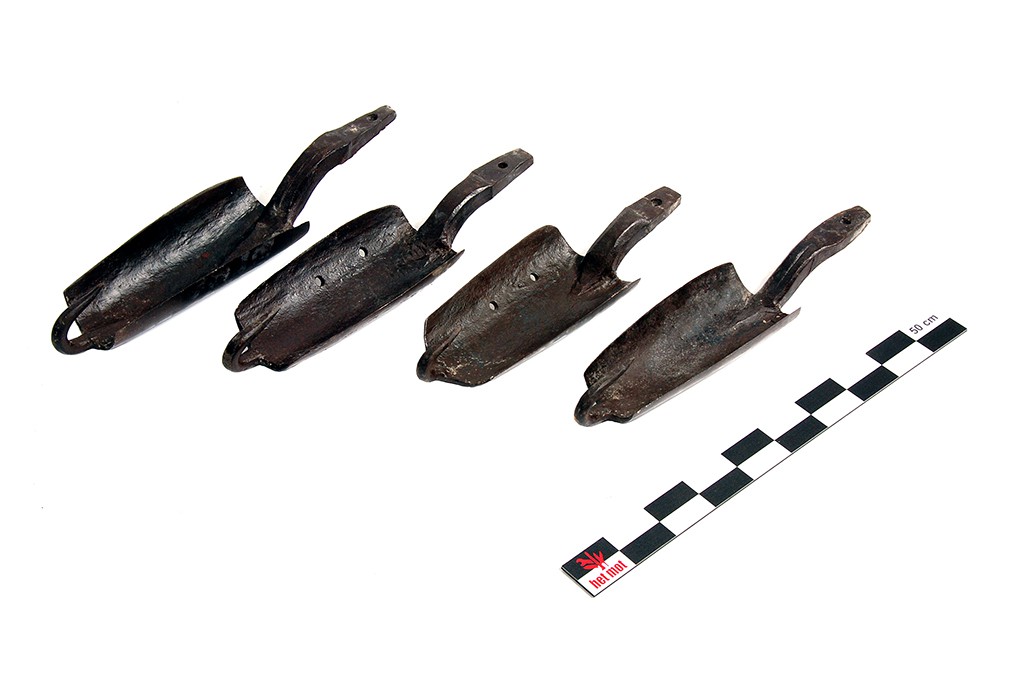
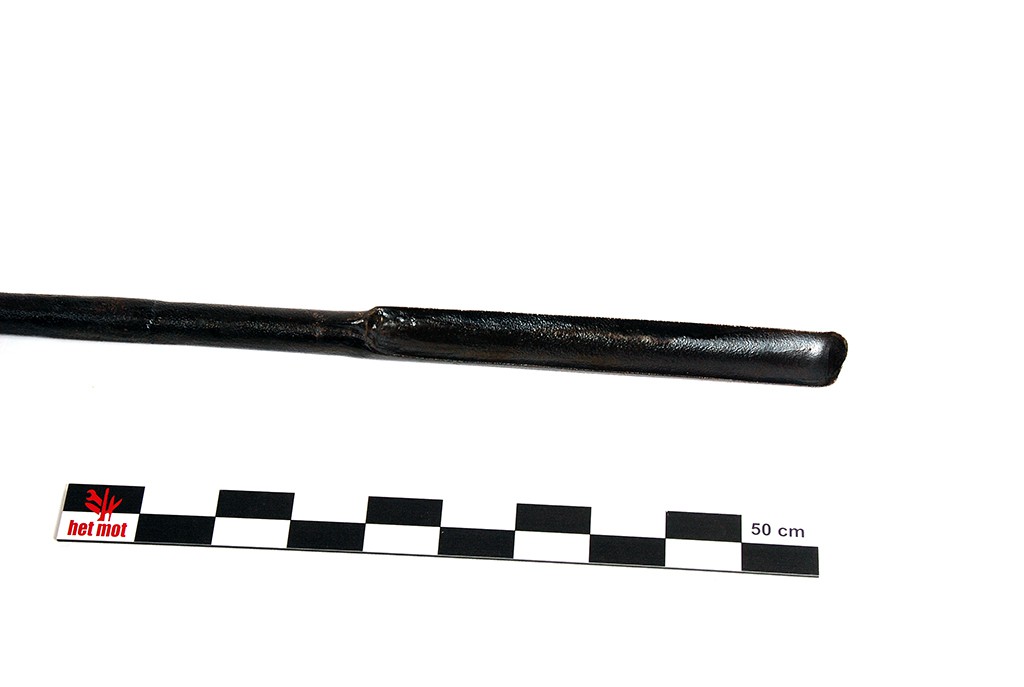
To let the pump auger rest stably in the center point of the trunk, a preparatory hole of about ten centimeters is drilled or chiseled with a first bit. Instead an auger or a gouge could be used as well.The first auger to be used is a specific pump auger with a diameter of 4 cm to pierce the trunk along its entire length. The auger bit has a sharp 'nose' or tooth and collects the wood chips in the approx. 25 cm long spoon shape. This model of pump auger only has a short handle of 10 to 15 cm, forged rectangulary with a hole to fit into the socket on the end of the long shaft, to which it is attached by an iron pin or a bolt. Sometimes the bit is forged on a very long rod, so that no extension is needed, like the one in our collection.
During the drilling process the auger is rotated a quarter of a turn each time. After about ten rotations the auger bit is filling up with wood shavings and has to be withdrawn to be emptied. During our experiment, the pump auger often got stuck and had to be pulled out forcefully by three to four people. Once removed, the remaining chips have to be cleared from the cavity by lightly twisting the auger bit several times in and out, which causes a lot of delay. Perhaps we were drilling against the grain, bumping into knots or missing the centerline of the trunk? Lack of experience and finesse will certainly explain play its part.
After several hours of drilling, the shaft of the pump auger could no longer be pushed deeper. and we turned the trunk 180° to drill at the other end in the same way towards the center of the trunk. Thanks to the craftsmanship of our woodworkers, both drilled holes in the center met each other quite accurately. After four hours, the entire trunk had been pierced by 4 cm.
Changing the setup naturally involves a risk. If you have enough free space, all you have to do is move the horse to the other end of the trunk and mirror the setup. If you have sufficiently long drill shafts or extensions up to 4.5 meters available, you can keep drilling in the same direction.
Second step: enlarging the hole
The pilot hole must now be widened about 5 to 6 cm with one or more pump rip bits with a slightly conical shape. Turning the crank requires less force than in the first step, sometimes one person is enough to get the job done.
This pump auger has a characteristic hook at the end, which has a double function. The hook pulls the wood shavings out but it can also hold a rope that leads through the borehole. A third person pulls this rope to get the rip bit to advance faster.
Good coordination between the operators at each side is needed to obtain a smooth progress. The rope must be uncoiled regularly. To get even more pulling force, we attached the rope to a winch.
Third step: shaping the pump body
The top part of the trunk, which will partly protrude above the ground, is now further enlarged for about 1.2 m to form the pump body, the mechanism that sucks the water upwards. This is done with a shorter, wider and strongly curved type of pump rip drill with a short curved shaft. Both the shape and the use of these drills are very similar to the nave borer of a wheelwright.
Depending on the type of pump, a wider rip bit is attached to ream the hole from approx. 5 to 6 cm to approx. 8 to 10 cm. The largest pump rip bits found by us are up to 14 cm wide. Just like the smaller rip bits, they can be made wider by attaching a 0.5-1 cm thick curved metal plate to the blunt side. To this end, two holes are often provided on the side for the bolts. That way the pump borer can drill holes of different diameters with one and the same pump rip bit.
The transition from the wide pump body to the narrower cavity is slightly conical, so that the pump lock can be tightly hammered in to prevent water from passing.