In this section we‘ve tried to provide a step-by-step plan to restore a two-part bakehouse, a type which is very common in Belgium. With a few small alterations you can also use this plan to restore a free-standing or an indoor oven.
Once you are familiar with the different components of a bread oven, you can examine your own oven to determine exactly what needs restoring.
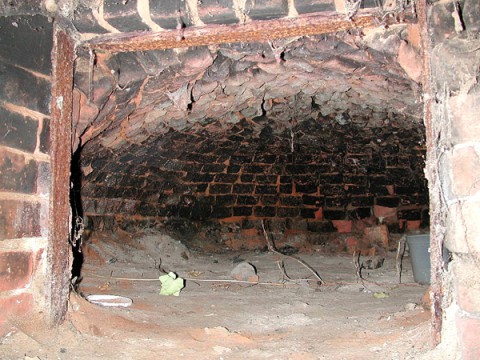
First look at the condition of the oven vault and floor. After all, these are essential components for baking and they are the most difficult to restore. Their condition may determine whether or not you want to proceed with the restoration.
If you do decide to restore it and you know exactly what has to be done, you can proceed.
Restoration of the oven vault
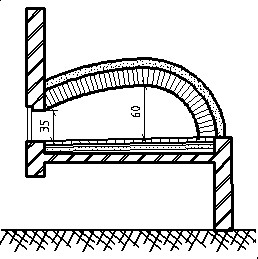
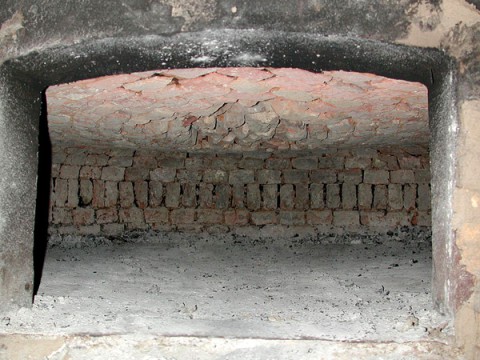
First look inside the oven itself. If no bricks can be seen in the arch, there is a chance that you have got a rare example of a clay oven, made completely out of clay. However, most ovens have a brick vault. The longitudinal section is shaped like an egg or a flattened dome.
The egg shaped vault is higher at the back than at the front, in order to keep the heat in the oven. The height of the vault is very important: if the vault is too high more fuel will be needed to reach the same temperature. The distance between the bread and the heat source (the vault) will also be too great. If the arch is too low, the bread will burn more easily. At the front you have a height of 35 to 45 cm, depending on the number of layers of bricks. The highest point is at a maximum of 60 cm.
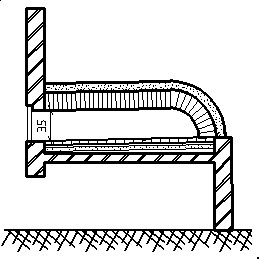
The vault in the shape of a flattened dome is as low as possible and follows exactly the slope of the oven floor. It has a minimum height of 30 cm over the entire length.
The cross section of both types has the form of a regularly curved line. If this is not the case, the vault will be subjected to severe tensions which can cause it to collapse.
If the oven vault has to be rebuilt, a supporting mould will have to be made before starting the brickwork. You can make this mould fairly easily yourself. Damp sand or sandy clay is poured on the oven floor and raised up in the shape of the vault that has to be built. In order to obtain the right dimensions, you can place a few vertical sticks in the axis of the vault, whose lengths correspond to the height of the vault. The sand can be shaped to obtain the right profile. This temporary sand sculpture forms a supporting surface on which the bricks can be laid. As soon as the vault has sufficiently dried, the sand is removed through the oven mouth.
When the mould is ready, the actual brickwork can start. Never proceed with this work in times of frost. Alternate freezing and thawing will expand and shrink the water in the clay mortar, which can result in cracking.
Generally the bricks are laid transversely so that the short side of the brick is visible. That way you obtain quite a thick vault (around 20 cm) that can store a great amount of heat. Another advantage of this brick pattern is that the bricks “burn through” less quickly. Just as with the oven floor, the joints on the inside have to be kept narrow and well filled with clay mortar. Today a fireproof mortar can be used. But we strenuously recommend to avoid the use of cement mortar! The high temperature differences can cause the mortar to crack, and the joints will then come loose.
After the oven vault has been finished, cover it with a layer of clay of around 10 to 15 cm to obtain good heat insulation. The bread oven now has to be left to dry for 3 to 4 days before ... The bread oven has to dry now for about 3 to 4 days before you remove the sand from the oven mouth. Check the mortar joints from the inside of the vault with your fingers, while wearing gloves for protection, to see if they are smoothly polished and filled up with mortar.
The oven has to dry now completely ( 2 to 3 months). You can speed up the process by placing some infra-red lamps inside. Ensure good ventilation and protection from the rain. If the oven was protected with a canvas, now is the right time to rebuild the roof.
When the oven looks dry, it has to be heated up gradually.
About this matter oven builders’ opinions differ:
Or you can follow the work procedure as described above until the bread oven has completely dried. After this you tend a small fire to keep the stones warm and to dry the bottom area of the oven. Your oven is only capable of sustaining real heat after all of these steps.
Or the whole oven has to dry for about three weeks and has to be stoked gradually.
- Remove the first 40-50 cm of sand from the mould and start a small fire in this space. Continue to heat until the drying is visible;
- In consecutive stages, remove around 25 cm of sand, each time making another small fire;
- Then leave the oven to dry for a day, without heating in;
- In the next stage, start and maintain a small gentle fire to keep the bricks warm and to enable deep drying;
- The oven is now ready to be heated to a hot temperature for the first time.